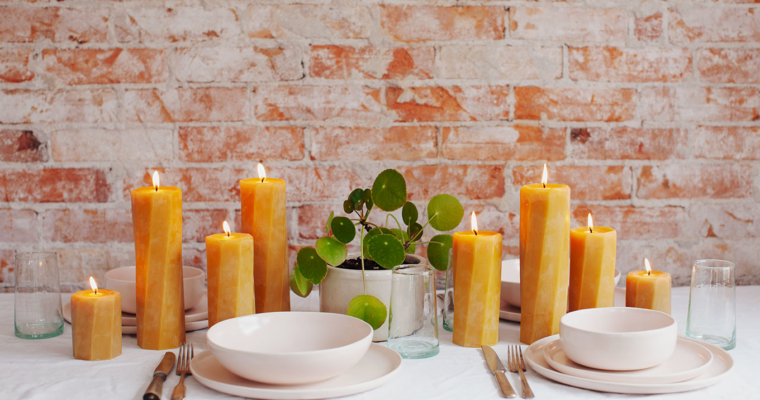
Smoky Tempeh Sandwich with Sundried Tomato Pesto

   56 Comments

tempehHello friends,
While I am away on holiday over the next few weeks, I will continue to post recipes just not full articles. Enjoy!

One thing I love about being in America are the amazing sandwiches you can get just about anywhere. On our California honeymoon I ate my fair share, and although Kauai seems rather far away from the mainland, there are health food stores selling amazing things between two slices of bread all over this island. Hoorah!

The other thing I love about America is the accessibility to foods like tempeh. Very hard to come by in Denmark, tempeh is a staple of my diet when I spend summers back home in Canada. Tempeh is a fermented soy “cake” that is super high in protein, phytonutrients, and minerals such as manganese, phosphorus, and copper. Although it may sound a little strange, I assure you that tempeh is delicious, and a fabulous food to supplement any diet whether you are vegetarian or not. I will also emphasize that I do not eat any non-fermented soy foods, such as tofu, but tempeh is high on my love list because it is highly digestible. If you have never tried tempeh before, this amazing sandwich would be a great way to give it a shot.

tempah3

I should mention that this sandwich was a last-minute addition to my travel food picnic basket. It kept really well for a few hours until the combination of temptation and sheer airplane boredom took hold. The sandwich is incredibly delicious. Spicy, smoky, tangy, juicy and crunchy – it really has it all going on. The pesto is a wonderful thing to make and have on hand in the fridge to perk up other kinds of sandwiches, or pastas, eggs, grain salads or roasted veggies. And the tempeh can be saved for more than just a sandwich. Try it crumbled up in a salad, or even served on the side of a savory breakfast.

tempeh2

Mango Cashew Sunshine Bites

   73 Comments

sunshinebites1

Hello friends,
While I am away on holiday over the next few weeks, I will continue to post recipes just not full articles. Enjoy!

I made it. My bean dip and everything else has officially passed through security on all three legs of my journey to Kauai. I am writing this 30,000 feet above the blue ocean, about two hours (out of the thirty eight!) from our final destination. I have never been so excited to get off a plane in. my. life.

As promised, here is the recipe for Mango Cashew Sunshine Bites that I made for my trip. When we left Denmark there was an impending snowstorm with no signs of spring whatsoever. My body was beginning to crave new flavours and my excitement for the tropics took hold. I wanted to pack in as many fresh and exotic tastes as I could, and these little beauties are the result. I absolutely love the tang of lime and mango combined with the warm, mellow vanilla vibes and crunchy coconut. The cashews lend a creaminess and the salt acts as the perfect balancer. I also added turmeric to the treats for a nutritional boost, but this is totally optional. Keep in mind that turmeric has a very mild flavour so you will not taste it at all. Plus, it really makes the golden colour pop!

sunshinebites3

Although these are raw and more of a warm-weather treat, they are still a great snack to have around all year. And because they use almost completely dried foods, you don’t need to wait for summer to make them.

The only tip I will offer for this recipe is choosing the right kind of dried mango. Most dried mango has been sweetened to high heaven and preserved with sulfites of some kind. Look for organic mango if possible, but always read the label – even organic dried mango can contain organic sugar.

sunshinebites2jpg

I hope you all enjoy these as much as I have and that you don’t wait for a long trip to try them out!

Love and sunshine,
Sarah B.

*   *   *   *   *   *

Hello friends!

I am excited to announce the next My New Roots class in Amsterdam. See the flyer for reservations and information. Hope you can join us!

AMScookingclass


Recipes and Tips for Healthy Travel

   117 Comments

travel
If there is one passion I have beyond cooking and eating, it is traveling.
In just one week I will be on a plane with my husband, heading for the tropical paradise of Kauai. It has been a dream of mine for many years to visit this Hawaiian island, and since my best friend is currently living there, I knew that this was the perfect opportunity. The only bummer about this incredible dream coming true? Oh, the 38-hours it will take to get there from Copenhagen. Yikes.

Yes, I love traveling, but I am not a huge fan of the in-transit time. Hauling luggage around. Layovers. Crowded airports. Until I actually arrive at my destination, I have my blinders on and my head down in total survival mode. You’d think for someone that travels as much as I do I would be used to all the schlepping by now, but I don’t think I’ll ever be in love with the line up at customs. It’s just not happening.

One thing I have happily mastered in all of my travel experience is the business of food. Just because I am in survival mode doesn’t mean I am eating questionably edible, pre-packaged sandwiches from the vending machine. No way. When this foodie is on the road (or in the sky), she comes fully prepared from door to door!

I take great pleasure in preparing my food for trips, and although it takes a little planning, am I ever chuffed cracking open my Tupperware of thoughtfully made salad, crackers, dip, and dessert, while other passengers are munching on mystery meat. More often that not, I end up sharing my meal with my seatmates, as they always ask about what I have with me. This leads to many great conversations – sometimes new friends – and I bet I’ve convinced more than one person that raw chocolate is better than their mini candy bar.

I posted a picture of my in-flight meal on Instagram during my last trip to Lisbon and the response was surprising: you want to know what to eat on the go! I am very happy to share my easy-to-make recipes that travel well if it means you’ll avoid schwaggy snacks eaten out of desperation too.

Now, I know that the list seems really long, but keep in mind I’ll be in transit for over an entire day and a half! And I eat a lot. And the last time I checked there were no restrictions on how much food you can take on a plane, just what you take.

Here’s what I am bringing with me on the epic trek across planet Earth:

Rice and Beet Salad (recipe below)
Happy Crackers
sprouts
Roasted Garlic and White Bean Dip (recipe below)
carrot and cucumber sticks
dried fruit
banana and pears
Simple Gourmet Granola
Mango-Cashew Sunshine Bites (next post!)

Here is what I’ve learned about traveling with food.

1. Pack foods that don’t need to be refrigerated. This one is obvious. All of the above items are fine out of the fridge for at least 24 hours. Soft cheeses, meat, and melty things are not the best choices.

2. Pack foods that will maintain good texture. I chose to make this rice and beet salad because the veggies will maintain their freshness and crispness throughout my journey. I find that all plane food is pretty one-note when it comes to consistency: mushy! I like to crunch on my food, so packing carrot sticks, cucumber, bell peppers, apples, sprouts, rice cakes, and crispy granola are always a safe bet. If you are going to eat greens, stick to romaine. Spinach, butter lettuces, and mixed greens wilt and get soggy. Also, pack foods in a specific order in your containers. With the rice and beet salad, you’ll notice that the rice and beets are on the bottom, while the romaine and cilantro are on top. Mix them all together just before eating and they will maintain their crispness for sure.

3. Pack foods that are easy to eat. I find sandwiches do not always fit in this category. If you do make a sandwich, keep the fillings small and non-liquid-y so that they are not oozing all over you when you take a bite. Sometimes I like to take a wrap with me because I can roll it up in a piece of parchment, which prevents dripping. Oranges and grapefruits are a bad call because they often require a hand washing. Also, don’t take foods that require knives as you can’t bring anything sharp in your carry-on, and you may have to wait for the food cart to come around before you can get your hands on utensils.

4. Be considerate. No one wants to sit beside Mrs. Garlic n’ Onions. Smelly cheeses, curry, and cooked cruciferous vegetables can stink up an entire plane with the flip of a Tupperware lid. The bean dip I made uses roasted garlic, which is far mellower and less offensive than raw garlic. The beet salad is rather inoffensive as well – the main smell is mustard, but it’s very mild. If you know that you’re about to drop a stinky food bomb, be thoughtful and eat when everyone else is so at least your smells are covered up by everyone else’s meal.

5. Avoid liquids. This is a no-brainer these days, but if you are going to take any kind of dip through security, make sure it can be turned upside down and not budge – think mashed potato consistency. It also really depends on who your security team is and what city you are in. Sometimes I get my hummus through one airport but I’ll be forced to toss it at the next one. It helps if the dip is not in a container with a weight or volume measure on the side and if it’s accompanied with veggie sticks, as pictured. If all else fails, playing dumb, smiling ever-so-sweetly and begging are seriously effective tactics. Remember, this is survival.

The following two recipes are very simple yet have been thoughtfully created for traveling.

The Rice and Beet Salad supplies you with whole grains for fiber, beets for cleansing your liver if you do choose to have a mini bottle o’ wine with your meal, walnuts for omega-3, cilantro for pulling heavy metals out of your blood, and romaine lettuce for vitamin C to ward off the flu from the dude sitting next to you. This salad has a high water content to keep you hydrated, and feeling like a human being when you land, instead of a zombie. The  Roasted Garlic White Bean and Tarragon Dip is flavourful, high in protein and fiber. The roasted garlic won’t be as offensive as raw garlic like in regular hummus. It is also much thicker than regular hummus so that you can get it through security!

travel2

Prepare the salad and bean dip well in advance of leaving for your trip – the day before is ideal. You need to make sure all the ingredients are cool before you make both dishes, so that they will keep for many hours outside of the fridge. If they are warm when you leave, they may spoil en route.


Help with Jetlag
Jetlag is a serious bummer. When you finally get to where you are going and all you want to do is sleep is incredibly frustrating.

The secret to combating this very common affliction is staying hydrated and avoiding those things that cause dehydration. I’ll share with you my own little tips that get me through every time. In fact, I rarely suffer from jetlag at all.

1. Drink tons of water. The circulated air on planes is incredibly dehydrating. Drink as much as you can the day you are traveling before you get to the airport. Take a bottle with you on the plane and have the flight attendants refill it often, or ask if you can have their 2-liter bottle for long-haul flights. They usually give me one, as they find coming to my seat every hour to fill my bottle annoying.
For every hour you are flying, drink at least 500ml / 17oz. of water (I aim for double this). This sounds like a lot, but it helps more than anything else. Yes, you may have to pee a lot, but it’s good to get out of your seat anyway.

2. No alcohol, coffee or tea. Yea, yea, I’m a big party pooper, but I say this in your best interest. Alcohol and caffeine are also dehydrating, which will exacerbate any feelings of jetlag you may have. Save the celebrations for when you actually get to your destination instead of suffering through a jetlag fueled hangover. The worst!

3. Limit or avoid the plane food. Meals on planes are heavily salted and/or sugared
because food tastes blander at high altitudes. To dilute both salt and sugar, your cells excrete water and send a thirst message to your brain saying they need more fluids. Wine does not help the situation. Nor does a cold beer, an iced tea, or coffee. Drink water on the plane only, and stick to high water content fruits and veggies. If you are going to be eating on the plane, order a vegetarian non-diary meal in advance – it’s your best bet!

Preparation for Coming Home
As a final detail, if you can plan ahead to your home coming, it will make the end of your trip a lot more pleasant. For my last meal at home I make a large pot of soup or stew and cook extra to freeze so that when I arrive back I have a meal waiting for me to heat and eat. It seems like a small thing, but when I get off the plane tired and needing a hot, nourishing meal, I know that there is one waiting for me when I get home without any fuss.

I hope that these recipes and lists of travel tips will help you on your next trip. Bon voyage! And I’ll see you when I am back from paradise…Peace out winter!

Superfood Nut Butter Cups

   98 Comments

nutbuttercups

I had pretty peculiar and passionate habits around candy as a kid. You can imagine then, that my favorite holiday of the year was Halloween.
I clearly remember coming home at the end of an exhausting night with my pillow case busting at the seams full of sugary bliss, dumping it all out on the living room floor and methodically sorting it. Little mountains of gummies, hard candies, mini chocolate bars and suckers landscaped the broadloom and I sat back admiring the new world I’d created. Obsessive? Oh yea. Freakishly.

But it didn’t stop there. Everything would then get put into smaller bags according to the type of candy and those into even smaller bundles according to how much I valued that particular item. I believe most “normal” kids would eat their favorite things first, but oh no, not me. I would actually suffer through all the cruddy stuff first and hoard the rest, usually well into the Christmas season when I knew my next shipment would be coming in with my stocking.

Where am I going with all of this? Well, to tell you that by the time Santa rolled into town I still had my Reese’s Peanut Butter Cups under my bed. Hands down, they were my all-time favorite.

nutbuttercups6

What is it about the combination of peanuts and chocolate? Undoubtedly, it goes beyond the magic of salty-sweet coupling to achieve something inexplicably divine. And although I’ve moved on from Reese’s, I still obsess over this pairing, albeit with a slightly more, ahem, healthy attitude.

We all know that the one thing I really love making in my kitchen is food that tastes like indulgence, but is secretly good for you (kind of the point of this blog). The biggest compliment my husband can give is: “this tastes so bad for me!” Mission accomplished. These nut butter cups fit the bill with their silky smooth, decadent chocolate and salty, nutty filling. Can I also tell you that they are healthy? No joke! When I set out to make these chocolates, I wanted to make sure I could eat more than one of them and feel good about it because I believe that is how eating should be.

The wonderful thing about this recipe, is that you will learn how to make a basic raw chocolate that you can turn into anything. Candies, bars, syrup, chocolate coating, whatever! Even if you just want to eat the chocolate all on its own you can do that too. It’s super simple to make, only requires a few ingredients and is so much healthier than the regular kind of chocolate you buy at the store and melt down yourself. It’s totally raw, full of superfood antioxidants and energizing enzymes. Food to love that loves you back.

nutbuttercups2

Lovin’ me some Lucuma
Here’s a groovy food I’ve never talked about before: Lucuma! Lucuma is a super fruit and a total superfood. It hails from Peru where it is known as “Gold of the Incas”, and has been cherished for centuries. Here in the west, the golden coloured pulpy fruit is rather difficult, if not impossible to find, so I purchase it its dried and powdered form.

Lucuma is sweet, but low on the glycemic scale, so it is perfect for anyone looking to decrease their sugar consumption. The flavour is similar to caramel or maple, so it lends itself to a wide variety of sweets. For breakfast, add a tablespoon of lucuma powder to smoothies, yogurt, and oatmeal. You can of course use it in desserts as well by blending it into pudding, cakes, cookies, candies, and bars. It is especially delicious in homemade ice cream!

Lucuma contains antioxidants, good amounts of fiber, healthy carbohydrates, and minerals such as zinc, calcium and iron. Judging the by the bright, yellow-orange hued flesh, we know that it is packed with beta-carotene, a powerful anti-carcinogenic compound.

Look for lucuma at health shops and natural food stores. Lucuma that has been dried at low temperatures and stone-ground is of the highest quality, as these processes preserve many of the delicate nutrients the fruit contains. If you are going to be using it in baked goods, this is less important. I’ve seen a few recipes online that use lucuma in cupcakes, breads, and cookies, which all sound amazing. If any of you have had success using lucuma in baked treats, let us know in the comments.


nutbuttercups5


The compulsive, candy-obsessed kid in me can’t quite believe I am saying this, but I’d give up my old peanut butter cups any day for these next-level versions. These are simply so delicious, so delectable and divine, the only behavior that I still carry with me is my inability to share. Workin’ on it.