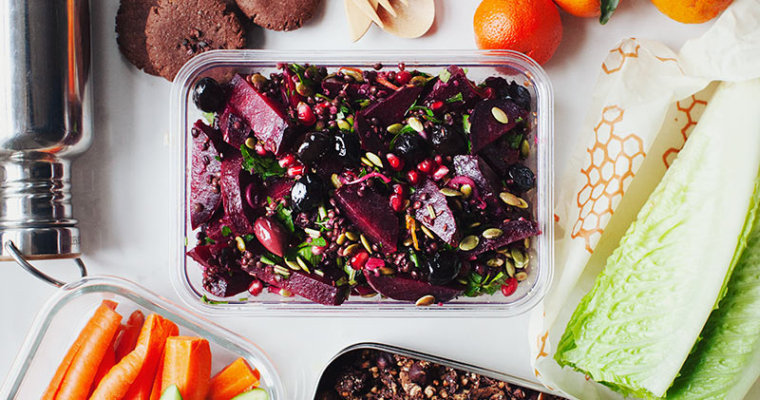
Category: Sugar-free

Mango Cashew Sunshine Bites

   74 Comments

sunshinebites1

Hello friends,
While I am away on holiday over the next few weeks, I will continue to post recipes just not full articles. Enjoy!

I made it. My bean dip and everything else has officially passed through security on all three legs of my journey to Kauai. I am writing this 30,000 feet above the blue ocean, about two hours (out of the thirty eight!) from our final destination. I have never been so excited to get off a plane in. my. life.

As promised, here is the recipe for Mango Cashew Sunshine Bites that I made for my trip. When we left Denmark there was an impending snowstorm with no signs of spring whatsoever. My body was beginning to crave new flavours and my excitement for the tropics took hold. I wanted to pack in as many fresh and exotic tastes as I could, and these little beauties are the result. I absolutely love the tang of lime and mango combined with the warm, mellow vanilla vibes and crunchy coconut. The cashews lend a creaminess and the salt acts as the perfect balancer. I also added turmeric to the treats for a nutritional boost, but this is totally optional. Keep in mind that turmeric has a very mild flavour so you will not taste it at all. Plus, it really makes the golden colour pop!

sunshinebites3

Although these are raw and more of a warm-weather treat, they are still a great snack to have around all year. And because they use almost completely dried foods, you don’t need to wait for summer to make them.

The only tip I will offer for this recipe is choosing the right kind of dried mango. Most dried mango has been sweetened to high heaven and preserved with sulfites of some kind. Look for organic mango if possible, but always read the label – even organic dried mango can contain organic sugar.

sunshinebites2jpg

I hope you all enjoy these as much as I have and that you don’t wait for a long trip to try them out!

Love and sunshine,
Sarah B.

*   *   *   *   *   *

Hello friends!

I am excited to announce the next My New Roots class in Amsterdam. See the flyer for reservations and information. Hope you can join us!

AMScookingclass


Superfood Nut Butter Cups

   98 Comments

nutbuttercups

I had pretty peculiar and passionate habits around candy as a kid. You can imagine then, that my favorite holiday of the year was Halloween.
I clearly remember coming home at the end of an exhausting night with my pillow case busting at the seams full of sugary bliss, dumping it all out on the living room floor and methodically sorting it. Little mountains of gummies, hard candies, mini chocolate bars and suckers landscaped the broadloom and I sat back admiring the new world I’d created. Obsessive? Oh yea. Freakishly.

But it didn’t stop there. Everything would then get put into smaller bags according to the type of candy and those into even smaller bundles according to how much I valued that particular item. I believe most “normal” kids would eat their favorite things first, but oh no, not me. I would actually suffer through all the cruddy stuff first and hoard the rest, usually well into the Christmas season when I knew my next shipment would be coming in with my stocking.

Where am I going with all of this? Well, to tell you that by the time Santa rolled into town I still had my Reese’s Peanut Butter Cups under my bed. Hands down, they were my all-time favorite.

nutbuttercups6

What is it about the combination of peanuts and chocolate? Undoubtedly, it goes beyond the magic of salty-sweet coupling to achieve something inexplicably divine. And although I’ve moved on from Reese’s, I still obsess over this pairing, albeit with a slightly more, ahem, healthy attitude.

We all know that the one thing I really love making in my kitchen is food that tastes like indulgence, but is secretly good for you (kind of the point of this blog). The biggest compliment my husband can give is: “this tastes so bad for me!” Mission accomplished. These nut butter cups fit the bill with their silky smooth, decadent chocolate and salty, nutty filling. Can I also tell you that they are healthy? No joke! When I set out to make these chocolates, I wanted to make sure I could eat more than one of them and feel good about it because I believe that is how eating should be.

The wonderful thing about this recipe, is that you will learn how to make a basic raw chocolate that you can turn into anything. Candies, bars, syrup, chocolate coating, whatever! Even if you just want to eat the chocolate all on its own you can do that too. It’s super simple to make, only requires a few ingredients and is so much healthier than the regular kind of chocolate you buy at the store and melt down yourself. It’s totally raw, full of superfood antioxidants and energizing enzymes. Food to love that loves you back.

nutbuttercups2

Lovin’ me some Lucuma
Here’s a groovy food I’ve never talked about before: Lucuma! Lucuma is a super fruit and a total superfood. It hails from Peru where it is known as “Gold of the Incas”, and has been cherished for centuries. Here in the west, the golden coloured pulpy fruit is rather difficult, if not impossible to find, so I purchase it its dried and powdered form.

Lucuma is sweet, but low on the glycemic scale, so it is perfect for anyone looking to decrease their sugar consumption. The flavour is similar to caramel or maple, so it lends itself to a wide variety of sweets. For breakfast, add a tablespoon of lucuma powder to smoothies, yogurt, and oatmeal. You can of course use it in desserts as well by blending it into pudding, cakes, cookies, candies, and bars. It is especially delicious in homemade ice cream!

Lucuma contains antioxidants, good amounts of fiber, healthy carbohydrates, and minerals such as zinc, calcium and iron. Judging the by the bright, yellow-orange hued flesh, we know that it is packed with beta-carotene, a powerful anti-carcinogenic compound.

Look for lucuma at health shops and natural food stores. Lucuma that has been dried at low temperatures and stone-ground is of the highest quality, as these processes preserve many of the delicate nutrients the fruit contains. If you are going to be using it in baked goods, this is less important. I’ve seen a few recipes online that use lucuma in cupcakes, breads, and cookies, which all sound amazing. If any of you have had success using lucuma in baked treats, let us know in the comments.


nutbuttercups5


The compulsive, candy-obsessed kid in me can’t quite believe I am saying this, but I’d give up my old peanut butter cups any day for these next-level versions. These are simply so delicious, so delectable and divine, the only behavior that I still carry with me is my inability to share. Workin’ on it.

The Life-Changing Loaf of Bread

   580 Comments

bread

It took me a long time to settle on the title for this post. Why? Because it’s quite a statement to suggest that a humble loaf of bread will change your life.
I am willing to be so bold.

bread4

When I began eating healthier, bread was definitely on my hit list. Not because bread is inherently “bad” (in my books nothing is that black and white), but that I knew when I was basing three meals a day around a loaf of crusty, white French loaf, something had to give. I realized that if I replaced a few slices of bread a day, I could make room for things like greens, fresh fruits, legumes, and that I would be getting more nutrients from the same amount of calories. Light bulb moment.

Now, that isn’t to say that my love affair with bread ended there. Oh no. When I moved to Denmark four years ago I fell head-over-heels for bread all over again, except this time, it wasn’t light and fluffy – it was kind of like the weather – dark, deep, and intense. The Danes are excellent bread makers, especially when it comes to sourdoughs and of course, rye. Bread here is hearty, filling, and a single slice is almost like a meal in itself. I love going to the bakery on Saturday morning and getting a loaf of rye that has naturally risen for days, been baked for 24 hours, and looks and feels like a brick.

People often ask me why I don’t bake my own bread, and the answer is simple: the Danes just do it better. And I like the ritual of walking down the canal to the bakery (rye bread is one of the few things I actually purchase “ready-made”). This way I appreciate bread on a whole other level and it becomes special. I savour every slice instead of making it every meal.

bread3

It wasn’t until I went for lunch at a friend’s place a couple weeks ago that my life changed. When I walked into her apartment I could smell it. Something malty and definitely baked, toasty, nutty…when I rounded the corner to her kitchen, there it was. A very beautiful loaf of bread, pretty as a picture, studded with sunflower seeds, chia and almonds, golden around the corners and begging me to slice into it.
She served it with a number of spreads; pesto, lentil hummus, some veggie pate. It magically seemed to compliment everything I slathered across its speckled flesh. Moist, dense, chewy. Hints of sea salt here and there, nestled between the oats, around the corner from a golden flax seed. So beautiful and more than tasty, this was a revelation. “Please tell me this is good for me!” I begged her.
She smiled.

Friendly Fiber: Psyllium Seed Husks
You’re probably asking yourself how the heck this bread holds itself together without any flour. Nice observation, and the answer is psyllium seed husks.

Psyllium seed husks are one of nature’s most absorbent fibers, able to suck up over ten times their weight in water. For this reason, you’ll often find psyllium in over-the-counter laxatives, stool-bulking agents and colon cleansing kits; basically anything having to do with poo. I just came back from running a detox course in Lisbon where I got all the participants in-the-know about this amazing little supplement that also helps to reduce cholesterol levels, aid digestion and weight loss, and alleviate diarrhea and constipation.

Psyllium seed husks contain both soluble and insoluble fiber. The soluble fiber dissolves in water and soothes the digestive tract with its mucilaginous properties, while the insoluble fiber acts like a broom to sweep the colon free of toxins. Taken during a detox, juice cleanse, or fast, psyllium can greatly improve the body’s ability to eliminate impurities. But the good news is, you can take it anytime – many people find that a daily dose of a teaspoon or two in a glass of water really helps them get their bowels moving, (or slow them down if necessary).*

But what does this have to do with bread? Well, the idea here is to use psyllium to bind all these lovely ingredients together without resorting to flour. There have been some low-carb bread recipes floating around the ‘net as of late that take advantage of psyllium and I think it’s a great idea. Eat delicious bread, have good poops. I’m in!

Psyllium is available at health food stores and most pharmacies. It comes in two forms, the raw husks themselves, and powdered, which are just the husks that have been pulverized. It is easier to take the powdered form as it dissolves easier in water, but that is not important in the case of this bread – either type work just fine. 

bread5

Now, allow me to explain the title. I know you’re just burning for me to back this up with a few good reasons, so here we go.

First of all, when I make bread, there are bowls, spoons, measuring cups and flour everywhere. There is always a mess to clean up, and my biggest pet peeve is trying to get the very last bit of dough unstuck from the mixing bowl. Serenity now.
The only thing this bread leaves you with is a used spoon and a measuring cup. Everything that you mix, you do so right in the loaf pan. Genius.

Secondly, bread almost always requires some kneading, then some waiting, and then perhaps more kneading. Maybe more waiting? I’m confused already.
This bread, on the other hand, is kind of brainless. Dump all the ingredients into the loaf pan, stir, and let it sit for a couple hours. Or overnight. Or all day. Or however long or short you find convenient. Whatevs. You rule the bread, not the other way around.

Third. Bread recipes are specific. Use this kind of flour, and that kind of yeast…
What if I told you that if you don’t have hazelnut, you could use almonds? If you don’t like oats, you could use rolled spelt. Out of maple syrup? Use honey! See where I am going with this? The only thing I will emphasize is to replace the ingredients in the same proportion and with a similar ingredient for the best results. The rest if your call.

Fourth, breads require a rising agent, whether that is a sourdough starter (this takes days to make) or commercial yeast (which should really be avoided if possible). This bread doesn’t. Great.

Fifth reason, your typical loaf of bread is not really that healthy. It uses flour, which has often been stripped of much of its fiber, bran, essential fats, and unless milled mere hours before baking has lost most of its nutrients through oxidation. It is high in carbohydrates (often refined ones at that) and low in protein and healthy fats. It is high in gluten, something many of us are trying to eat less of. And sometimes bread has kooky ingredients like corn syrup and food colouring. Seriously. Read those labels.

The Life-Changing Loaf uses whole grains, nuts, and seeds. It is high in protein. It is incredibly high in fiber. It is gluten-free and vegan. Everything gets soaked for optimal nutrition and digestion. I will go so far as to say that this bread is good for you.

Sixth, this bread makes the best toast. Ever.

bread2


I realize that few pleasures in life will ever be able to compete with tearing open a fresh baguette, or slicing into a thick-crusted country levain, and I am not suggesting that those pleasures be forgotten. On the contrary, let’s let those things be what they are and enjoy them from time to time. And for now, and hopefully the better part of your bread-munching days, I offer my latest and greatest pleasure to you; a loaf with no down-side, a bread with personality, a triumphant flag raised high exclaiming that deliciousness and health are not exclusive.

This bread changed my life. Will it change yours too?

Q & A:
To answer the number of questions about substitutions coming into the comments section, I will answer some here. Please be advised that I cannot guarantee any results beyond the recipe above. To help out, if you do make a successful substitution, let me know in the comments! Thanks!

1. There is no substitute for the psyllium husks. Whenever I write an entire article about a specific ingredient, it is because THAT is the point of the recipe, as it highlights one way you can use it. For those of you who can’t find psyllium, buy it online. It’s cheap.
2. For nut substitutions, the bulk of this bread is nuts and seeds so you’ll have to skip the recipe. If it is JUST a nut allergy and seeds are okay, replace the nuts with seeds.
3. You can use ground flax seeds instead of whole, but you’re going to need a lot more water as the ground flax seed is highly absorbent.
4. Substituting the oats with quinoa flakes may work, but again, they absorb a lot more water than oats do. Add more water accordingly.
5. Oats are inherently gluten-free, but if you have a sensitivity to gluten, make sure to purchase certified gluten-free oats.
6. For sugar-free or low-sugar diets, use a pinch stevia to replace the maple syrup.
7. A flexible, silicon loaf pan is best because you can test to see if the dough is holding together, and it’s easy to remove the loaf from the pan, BUT, a regular pan should be fine.
8. This bread is not raw. I haven’t tried drying it out. If you want to make it raw I suggest *trying* to slice it before you bake it and dehydrating the slices individually.


* if you are interested in taking a dietary psyllium supplement, please read the instructions carefully. Do not give psyllium to young children, as it can be a choking hazard.

Fabulous Fermentation Week! ~ Kimchi

   99 Comments

kimchi4

Bacteria!
Are you scared yet? For some reason, in modern North American culture, bacteria has become something to be feared, and most certainly destroyed. Heaven forbid you put the word bacteria in the same sentence as food, because we’ve all decided that these two things most certainly do not mix. But wait a minute…most of us actually ingest a lot of bacteria and fungus-laden food and drink, such as yogurt, sourdough bread, olives, soy sauce, and wine, without really thinking about it. So how have we gotten so freaked out by these little microorganisms that we feel the need to wage war?

Elenore of Earthsprout and I got to talking recently, and as per usual, it was about all things edible. We both love fermented foods and decided to ask all our fav food bloggers to join us in spreading the word about how awesome and easy it is to make your own fermented foods at home! We have such a treat for you over the next seven days, as we celebrate fermentations with tons of recipes and ideas for all of you to get on board. Welcome to Fabulous Fermentation Week! (see all participants’ links at the end of this post…)

Most cultures around the world in fact use bacteria to make food more amazing, because something really cool happens when these two entities meet: we get fermentation. Fermentation is the process of a carbohydrate being converted into an acid or an alcohol. Under the right conditions foods will naturally ferment, which is precisely how the process was discovered over 5000 years ago.

So, um, bacteria kind of rocks. You heard me. I can rattle off a million reasons why those teeny-tiny organisms are good for you, and actually important for your health – not a threat as we’ve been conditioned to believe.

Why Bacteria is your Buddy
When we eat fermented foods, we eat the beneficial bacteria – the probiotics – that the food contains. This is important because we need a diverse population of bacteria in our digestive system for optimal health. To name just a few of their functions, probiotics are responsible for promoting regular bowel movements (helping to relieve diarrhea and constipation), improving digestion, enhancing immune function, producing antioxidants, normalizing skin conditions, reducing cholesterol, maintaining bone health, and managing blood sugar levels. The foods we eat play a huge role in the health of our precious populations. By eating fermented foods that contain natural, good bacteria, we boost the number and variety of bacteria living in our guts, almost like taking probiotic supplements, except much less expensive and much more delicious.

The bottom line is fermented foods are amazing for your overall health. The larger the variety of fermented foods you can take in the better, as this helps populate your digestive system with a variety of microorganisms. Some examples for fermented foods that are widely available are plain yogurt, miso, tempeh, pickles, sauerkraut, kefir, kimchi, and kombucha. When purchasing these items make sure that they do not contain sugar, preservatives, food dyes, and most importantly that they have not been pasteurized. Heat destroys all the delicate bacteria, so the foods must be raw to be beneficial. This may mean a good old-fashioned DIY or that you visit a market or health food shop instead of a traditional grocery store, but I have no doubt you will discover a whole world of awesome fermented-ness that you didn’t even know existed! Party!

kimchi2

Lactic acid fermentation is just one process of which we are all familiar with, even if you’ve never heard the term before. Lactic acid fermentation is responsible for the sour taste of fermented vegetables such as sauerkraut, and pickles. The sugar in the cabbage and cucumbers respectively, feed that bacteria and in turn that sugar is converted into lactic acid, which serves as a natural preservative.

One of my all-time favorite things to ferment is cabbage and turn it into kimchi. Through the process of lactic acid fermentation this humble cruciferous goes from ho-hum, to ka-BLAM! Kimchi is Korea’s national dish, and it is really spicy, tangy and totally addictive. If you’ve ever been to a Korean restaurant you’ve undoubtedly been served this fermented cabbage delight, most likely on the side of your meal.
I like to make kimchi because it is very simple and you don’t need to wait a long time to enjoy the results. Even if you have never made a single pickle in your life, kimchi is great first-timer’s fermentation project because it tastes great no matter what you do to it!

kimchi5

My version of kimchi is vegan and gluten-free. I am aware that most traditional kimchi is made with fish sauce or soy sauce, but I wanted to create a recipe that vegans and those avoiding gluten can enjoy. I’ve also chosen to go with a simplified method that doesn’t require soaking the cabbage in salt water overnight. I have experimented with both methods, and I just find the one I am presenting you with today is easier for beginners. I do not claim to be a kimchi expert, but I do know that this stuff is easy to make and darn tasty.

kimchi1


kimchi3

Troubleshooting
I will now attempt to predict your questions and answer them…

Q: My kimchi has been on my counter for a few days. How do I know when its ready?
A: Smell and taste the kimchi. The scent will be very strong, but pleasantly sour. The taste is the same; pungent and spicy, but not foul. The kimchi is ready whenever you feel it tastes as strong as you want it to. Remember that the longer you leave it at room temperature, the stronger it will become. The kimchi will continue to ferment in the fridge but at a much slower rate, so give it as long as you like in a warm environment before moving it to a cool one.

Q: I think my kimchi has gone bad. How do I know?
A: Trust me, you’ll know. Bad kimchi is really gross. And it’s really hard to get it to the point of spoiling, so don’t worry too much. You won’t be able to eat enough spoiled kimchi to get sick from it anyway – your taste buds will tell you to stop.

Q: My kimchi is moldy, what should I do?
A: If you see mold beginning to form at the top of your kimchi, your jar was probably not sterile enough. Throw out this batch and start again. Make sure to use clean equipment. And remember that when you take kimchi from the jar, use only clean utensils (i.e. don’t fork out a bunch, clean the fork with your mouth and go back for more).

Q: My kimchi is too strong for my taste. Any tips?
A: Yes! Mix the kimchi with other vegetables or grain to mellow out the flavour. Alternatively, lightly cooking kimchi greatly reduces the sour taste and spiciness. Remember – don’t heat it too long or you’ll lose most of the nutrition and probiotics.

I’ve done all kinds of fermenting in my young life, because I am a huge food geek. The more I experiment, the bigger my edible world gets! Pretty exciting stuff to learn that you can turn ordinary foods in super foods in just a few simple steps. I realize that leaving things sitting out on the counter is waaaaay counter-intuitive – it may even seem like a mental hurdle to get over, but please trust me, it will all be okay. Your universe is about to expand, your gut is about to get healthier, and your taste buds are about to go on the craziest joy ride, ever.

For more information and recipes, I highly recommend the best books on the subject, Wild Fermentation and The Art of Fermentation, both written by my fermentation hero, Sandor Ellix Katz. Check out his website for forums, recipes and general geekiness too.

Love and bacteria,
Sarah B.

Fabulous Fermenation Week Friends!
Earthsprout
Green Kitchen Stories
Golubka
Whole Promise
Two Blue Lemons
Coconut & Quinoa
The Wooden Spoon
Eat it.
Kyra’s Kitchen
Ola Domowa
Mince & Type
The First Mess
The Holy Kale
Healthy & Hopeful
My Wholefood Romance
Kale and Cardamom
The Conscious Kitchen
Cucine Ceri
Nourish
Le Passe Vite
Ola Domowa I & II
Super Foodie Adventure
Choosing Raw
Figgy & Sprout
 Phickle -  an entire blog about Fermentation!