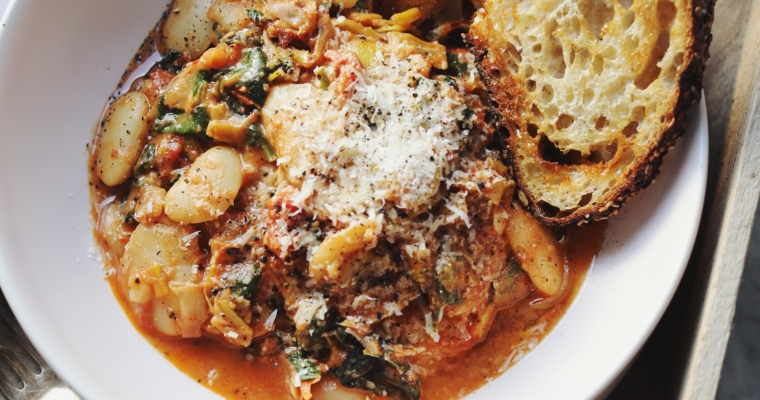
Hello friends, While I am away on holiday over the next few weeks, I will continue to post recipes just not full articles. Enjoy!
One thing I love about being in America are the amazing sandwiches you can get just about anywhere. On our California honeymoon I ate my fair share, and although Kauai seems rather far away from the mainland, there are health food stores selling amazing things between two slices of bread all over this island. Hoorah!
The other thing I love about America is the accessibility to foods like tempeh. Very hard to come by in Denmark, tempeh is a staple of my diet when I spend summers back home in Canada. Tempeh is a fermented soy “cake” that is super high in protein, phytonutrients, and minerals such as manganese, phosphorus, and copper. Although it may sound a little strange, I assure you that tempeh is delicious, and a fabulous food to supplement any diet whether you are vegetarian or not. I will also emphasize that I do not eat any non-fermented soy foods, such as tofu, but tempeh is high on my love list because it is highly digestible. If you have never tried tempeh before, this amazing sandwich would be a great way to give it a shot.
I should mention that this sandwich was a last-minute addition to my travel food picnic basket. It kept really well for a few hours until the combination of temptation and sheer airplane boredom took hold. The sandwich is incredibly delicious. Spicy, smoky, tangy, juicy and crunchy – it really has it all going on. The pesto is a wonderful thing to make and have on hand in the fridge to perk up other kinds of sandwiches, or pastas, eggs, grain salads or roasted veggies. And the tempeh can be saved for more than just a sandwich. Try it crumbled up in a salad, or even served on the side of a savory breakfast.
Smoky Tempeh Sandwich with Sundried Tomato Pesto Makes 1 sandwich
2 slices wholegrain sourdough bread a few slices Smoky Tempeh a generous slather of Sundried Tomato Pesto ¼ – ½ ripe avocado plenty of salad greens (spinach, butter lettuce, arugula etc.) cracked black pepper
Smoky Tempeh Ingredients: 1 package tempeh 7oz. / 200g 1 Tbsp tamari 1 Tbsp. maple syrup 1 tsp. melted coconut oil or ghee 1 tsp. smoked hot paprika or ground chipotle
Directions: 1. Slice the tempeh into slabs or long strips, depending on the shape of your block of tempeh. 2. In an oven-proof dish whisk together all other ingredients. Place the tempeh in a single layer covering the bottom of the dish, then flip each piece so that it is coated with the marinade on both sides. 3. Place in a 375°F / 190°C oven for 20-30 minutes until the tempeh has absorbed the marinade. Remove from oven and let cool until you are ready to make your sandwiches.
Sundried Tomato Pesto Makes about 1 cup
Ingredients: 1/3 cup / 50g organic sundried tomatoes 2/3 cup / 150ml hot water ½ cup / 65 g pumpkin seeds 1 clove garlic 2 Tbsp. cold-pressed olive oil salt to taste, if desired 1 tsp. raw honey (or maple syrup) if desired
Directions: 1. Place the tomatoes in a bowl and cover with just-boiled water. Let soak until soft, about 30 minutes. 2. In a dry skillet over medium heat, lightly toast the pumpkin seeds until they puff up and smell nutty. Be careful not to burn them! If you want a completely raw pesto, skip this step or soak the seeds overnight to activate them. 3. Drain the tomatoes through a strainer over another bowl to catch the water – you need to save the liquid for the pesto as it contains many nutrients and tons of flavour. 4. In a food processor, pulse peeled garlic to mince. Add all other ingredients, except salt and sweetener, and blend on high until smooth. Taste for seasoning and add salt or sweetener if desired. Store in a tightly sealed glass container in the fridge for up to one week. Enjoy on sandwiches, with eggs, on pasta, or as a dressing on grain salads and fresh veggies.
To Assemble: 1. Toast bread if desired. 2. Slater one half of the bread with Sundried Tomato Pesto. Place sliced avocado on top of the pesto, followed by tempeh and greens. Serve immediately and enjoy, or wrap up for a picnic later in the day.
If there is one passion I have beyond cooking and eating, it is traveling. In just one week I will be on a plane with my husband, heading for the tropical paradise of Kauai. It has been a dream of mine for many years to visit this Hawaiian island, and since my best friend is currently living there, I knew that this was the perfect opportunity. The only bummer about this incredible dream coming true? Oh, the 38-hours it will take to get there from Copenhagen. Yikes.
Yes, I love traveling, but I am not a huge fan of the in-transit time. Hauling luggage around. Layovers. Crowded airports. Until I actually arrive at my destination, I have my blinders on and my head down in total survival mode. You’d think for someone that travels as much as I do I would be used to all the schlepping by now, but I don’t think I’ll ever be in love with the line up at customs. It’s just not happening.
One thing I have happily mastered in all of my travel experience is the business of food. Just because I am in survival mode doesn’t mean I am eating questionably edible, pre-packaged sandwiches from the vending machine. No way. When this foodie is on the road (or in the sky), she comes fully prepared from door to door!
I take great pleasure in preparing my food for trips, and although it takes a little planning, am I ever chuffed cracking open my Tupperware of thoughtfully made salad, crackers, dip, and dessert, while other passengers are munching on mystery meat. More often that not, I end up sharing my meal with my seatmates, as they always ask about what I have with me. This leads to many great conversations – sometimes new friends – and I bet I’ve convinced more than one person that raw chocolate is better than their mini candy bar.
I posted a picture of my in-flight meal on Instagram during my last trip to Lisbon and the response was surprising: you want to know what to eat on the go! I am very happy to share my easy-to-make recipes that travel well if it means you’ll avoid schwaggy snacks eaten out of desperation too.
Now, I know that the list seems really long, but keep in mind I’ll be in transit for over an entire day and a half! And I eat a lot. And the last time I checked there were no restrictions on how much food you can take on a plane, just what you take.
Here’s what I am bringing with me on the epic trek across planet Earth:
Rice and Beet Salad (recipe below) Happy Crackers sprouts Roasted Garlic and White Bean Dip (recipe below) carrot and cucumber sticks dried fruit banana and pears Simple Gourmet Granola Mango-Cashew Sunshine Bites (next post!)
Here is what I’ve learned about traveling with food.
1. Pack foods that don’t need to be refrigerated. This one is obvious. All of the above items are fine out of the fridge for at least 24 hours. Soft cheeses, meat, and melty things are not the best choices.
2. Pack foods that will maintain good texture. I chose to make this rice and beet salad because the veggies will maintain their freshness and crispness throughout my journey. I find that all plane food is pretty one-note when it comes to consistency: mushy! I like to crunch on my food, so packing carrot sticks, cucumber, bell peppers, apples, sprouts, rice cakes, and crispy granola are always a safe bet. If you are going to eat greens, stick to romaine. Spinach, butter lettuces, and mixed greens wilt and get soggy. Also, pack foods in a specific order in your containers. With the rice and beet salad, you’ll notice that the rice and beets are on the bottom, while the romaine and cilantro are on top. Mix them all together just before eating and they will maintain their crispness for sure.
3. Pack foods that are easy to eat. I find sandwiches do not always fit in this category. If you do make a sandwich, keep the fillings small and non-liquid-y so that they are not oozing all over you when you take a bite. Sometimes I like to take a wrap with me because I can roll it up in a piece of parchment, which prevents dripping. Oranges and grapefruits are a bad call because they often require a hand washing. Also, don’t take foods that require knives as you can’t bring anything sharp in your carry-on, and you may have to wait for the food cart to come around before you can get your hands on utensils.
4. Be considerate. No one wants to sit beside Mrs. Garlic n’ Onions. Smelly cheeses, curry, and cooked cruciferous vegetables can stink up an entire plane with the flip of a Tupperware lid. The bean dip I made uses roasted garlic, which is far mellower and less offensive than raw garlic. The beet salad is rather inoffensive as well – the main smell is mustard, but it’s very mild. If you know that you’re about to drop a stinky food bomb, be thoughtful and eat when everyone else is so at least your smells are covered up by everyone else’s meal.
5. Avoid liquids. This is a no-brainer these days, but if you are going to take any kind of dip through security, make sure it can be turned upside down and not budge – think mashed potato consistency. It also really depends on who your security team is and what city you are in. Sometimes I get my hummus through one airport but I’ll be forced to toss it at the next one. It helps if the dip is not in a container with a weight or volume measure on the side and if it’s accompanied with veggie sticks, as pictured. If all else fails, playing dumb, smiling ever-so-sweetly and begging are seriously effective tactics. Remember, this is survival.
The following two recipes are very simple yet have been thoughtfully created for traveling.
The Rice and Beet Salad supplies you with whole grains for fiber, beets for cleansing your liver if you do choose to have a mini bottle o’ wine with your meal, walnuts for omega-3, cilantro for pulling heavy metals out of your blood, and romaine lettuce for vitamin C to ward off the flu from the dude sitting next to you. This salad has a high water content to keep you hydrated, and feeling like a human being when you land, instead of a zombie. The Roasted Garlic White Bean and Tarragon Dip is flavourful, high in protein and fiber. The roasted garlic won’t be as offensive as raw garlic like in regular hummus. It is also much thicker than regular hummus so that you can get it through security!
Prepare the salad and bean dip well in advance of leaving for your trip – the day before is ideal. You need to make sure all the ingredients are cool before you make both dishes, so that they will keep for many hours outside of the fridge. If they are warm when you leave, they may spoil en route.
Rice and Beet Salad Serves 1
Ingredients: ½ cup short grain brown rice (won’t get mushy in the dressing like long-grain varieties) 1 cup water 2 medium beets ½ head romaine lettuce 1 small bunch cilantro (or flat leaf parsley, dill) handful of walnuts
Honey-Maple- Mustard Dressing: 1 Tbsp. cold-pressed olive oil 2 tsp. mustard 1 tsp. maple syrup 1 tsp. apple cider vinegar pinch sea salt and cracked black pepper
Whisk all ingredients together. Season to taste.
Directions: 1. To roast beets, wrap whole unpeeled beets in foil, and place in a 400°F / 200°C oven for 30-45 minutes, until tender. When cool enough to handle, unwrap and slip skins off. 2. While the beets are roasting, rinse the rice, combine it with the water and a pinch of salt in a small saucepan. Bring to a boil, reduce to simmer and cook covered, for about 45 minutes. Let cool. 3. Chop beets into large chunks and toss with half of the dressing. When rice is cool, toss with the other half of the dressing. In your container, lay the rice in one half of the bottom, then the beets on the other half. 4. Chop romaine and cilantro and place on top of the rice and beets. Sprinkle with walnuts. Cover and store in the fridge right until you leave the house.
Roasted Garlic White Bean and Tarragon Dip
Ingredients: 1 head garlic 2 cups cooked white beans (navy, cannellini, butter etc) 1/3 cup shelled sunflower seeds zest and juice of 1 organic lemon 1 Tbsp. cold-pressed olive oil 1 tsp. maple syrup 5 Tbsp. chopped fresh tarragon sea salt to taste (this will depend on whether or not your beans are salted)
Directions: 1. To roast garlic, cut the top off the head to expose the cloves beneath. Drizzle with 1 tsp. olive oil and wrap tightly with foil. Let roast in a 400°F / 200°C oven for 30-40 minutes until soft. 2. Cook beans if using dried. Let cool completely. Canned is fine. 3. In a dry skillet over medium heat, lightly toast sunflower seeds. Remove from heat. 4. In a food processor pulse sunflower seeds until ground. Add all other ingredients and blend until smooth. Season to taste. Store in a container in the fridge until you leave the house.
Help with Jetlag Jetlag is a serious bummer. When you finally get to where you are going and all you want to do is sleep is incredibly frustrating.
The secret to combating this very common affliction is staying hydrated and avoiding those things that cause dehydration. I’ll share with you my own little tips that get me through every time. In fact, I rarely suffer from jetlag at all.
1. Drink tons of water. The circulated air on planes is incredibly dehydrating. Drink as much as you can the day you are traveling before you get to the airport. Take a bottle with you on the plane and have the flight attendants refill it often, or ask if you can have their 2-liter bottle for long-haul flights. They usually give me one, as they find coming to my seat every hour to fill my bottle annoying. For every hour you are flying, drink at least 500ml / 17oz. of water (I aim for double this). This sounds like a lot, but it helps more than anything else. Yes, you may have to pee a lot, but it’s good to get out of your seat anyway.
2. No alcohol, coffee or tea. Yea, yea, I’m a big party pooper, but I say this in your best interest. Alcohol and caffeine are also dehydrating, which will exacerbate any feelings of jetlag you may have. Save the celebrations for when you actually get to your destination instead of suffering through a jetlag fueled hangover. The worst!
3. Limit or avoid the plane food. Meals on planes are heavily salted and/or sugared because food tastes blander at high altitudes. To dilute both salt and sugar, your cells excrete water and send a thirst message to your brain saying they need more fluids. Wine does not help the situation. Nor does a cold beer, an iced tea, or coffee. Drink water on the plane only, and stick to high water content fruits and veggies. If you are going to be eating on the plane, order a vegetarian non-diary meal in advance – it’s your best bet!
Preparation for Coming Home As a final detail, if you can plan ahead to your home coming, it will make the end of your trip a lot more pleasant. For my last meal at home I make a large pot of soup or stew and cook extra to freeze so that when I arrive back I have a meal waiting for me to heat and eat. It seems like a small thing, but when I get off the plane tired and needing a hot, nourishing meal, I know that there is one waiting for me when I get home without any fuss.
I hope that these recipes and lists of travel tips will help you on your next trip. Bon voyage! And I’ll see you when I am back from paradise…Peace out winter!
All right, it’s official. I am so over winter. Although I can sense the days getting longer and the sky brightening ever so slightly, I just feel schlumpy. Is that a word? No. But I think you’re picking up what I’m putting down.
When the world is cold and dark, I want comforting foods that stick to my ribs and fill me with warmth. I’ve been on a creamy polenta kick lately, enjoying lots of the Life-Changing Loaf of Bread, rich curries, and coconut soup. One ingredient that really epitomizes hearty, winter food for me, is barley. Adding barley to a soup enhances the flavour and adds a rich creaminess to any broth. This is how I was introduced to barley in fact, but recently I’ve been cooking it whole and using it as a base for winter salads with add-ins like roasted veggies, toasted nuts, and even soft-boiled eggs. I find that it is really filling without that being heavy – something that is important to me even on the darkest days.
Barley comes is commercially available in a few varieties, as hulled whole grains, scotch barley, and pearled, of which most of us are familiar. The process of pearling barley is quite similar to the process used to remove the bran of grains like rice, turning brown rice into white rice. However, barley can be sold lightly pearled or completely pearled, which changes the taste, texture and overall cooking time of the grain. Of course the more pearled the grains of barley are, the less nutritious they are as so many trace elements are contained in the bran which is stripped during this process. It is for this reason that I encourage you to seek out hulled, whole grain barley (sometimes sold as “hulless” or dehulled” barley), scotch barley (in between hulled and pearled) or pearled barley that has only been lightly processed (sold as “lightly pearled” barley – see photo above). Steer clear of medium to fine pearled barley that is very light in colour with little of the brown bran still in tact.
Barley is a fiber superstar. In fact, one cup of barley provides the body with 13.6 grams of fiber – that’s over half of your daily recommended intake (the same amount of brown rice by comparison, contains only 3.5 grams of fiber). Barley is also known for its high selenium content – an essential trace mineral that is lacking in many of our diets. Not only is selenium needed for thyroid hormone metabolism, antioxidant defense, and immune function, but there are now clear links between selenium and cancer prevention. Selenium has been shown to stimulate DNA repair in damaged cells, to inhibit the proliferation of cancer cells, as well as induce apoptosis – our cells’ mechanism for self-destruction when they are abnormal, worn-out, or damaged. [1]
This dish was inspired by the last of the citrus I found at the market and the realization that I hadn’t yet taken advantage of blood oranges this winter. Blood oranges are one of my favorite fruits. They are sweet like navel or Valencia oranges, but with an unmistakable tang, somewhere between a lemon and a raspberry. Their deep pigment is due to their anthocyanin content, a powerful antioxidant that is also responsible for the colour of cherries, black bean and ah-ha! Red cabbage too. It’s safe to say that this dish is full of fiber and life-giving nutrients, mighty enough to get you through this last stretch of frosty winter days.
Blood-orange Braised Cabbage on Barley Serves 3-4
Ingredients: 1 cup / 200g lightly pearled or hulled barley 2 – 2 ½ cups water or broth ¼ tsp. sea salt
1 small head red cabbage (approx. 500g /1 lb.) 2 medium onions 4 cloves garlic knob of coconut oil or ghee ½ tsp. sea salt 5 bay leaves 1 Tbsp. fennel seeds ½ Tbsp mustard seeds 2 whole star anise black pepper 1 cup blood orange juice (from 3-4 oranges, any orange would be fine) 2 Tbsp. apple cider vinegar 1 blood orange, segmented for garnish olive oil to garnish flat-leaf parsley (or mint), for garnish if desired
Directions: 1. In a measuring cup, measure out 1 cup of barley, cover with water and rub grains together to wash. Drain and repeat until water is almost clear. Drain and place in a small saucepan with 2 cups water or broth and salt. Cover, bring to a boil, reduce to simmer and cook until tender, about 40-50 minutes (if the liquid evaporates before the barley is cooked, add another half cup water). Remove from heat, let sit for a few minutes, then fluff with a fork. 2. While the barley is cooking, prepare all the vegetables. Slice the cabbage into thin ribbons, slice onions, mince garlic. Juice oranges, and segment one for garnish, set aside. 3. Heat a knob of coconut oil or ghee in a large stockpot. Add mustard seeds. When mustard seeds begin to pop, add fennel seeds, bay leaves, star anise, and a few grinds of black pepper. Let cook for about a minute. Add onions, stir to coat and cook until softened, about 5 minutes. Add garlic, salt, and cabbage, stir to coat and let sit on medium heat for a couple minutes to caramelize the vegetables. 4. Next add the apple cider vinegar and stir – this will deglaze the bottom of the pot. Pour in the orange juice, stir well. With the pot covered, bring to a boil, reduce to simmer and let cook for 10-20 minutes, stirring occasionally, until the cabbage is cooked to your liking (I prefer mine al dente, tender but with a slight crispness still left). 5. Section a blood orange for garnish, set aside. Roughly chop parsley. 6. To serve, place a helping of barley on each plate, followed by the braised cabbage, a few segments of blood orange, parsley, and a drizzle of olive oil. Enjoy warm, or folded together as a salad in the warmer months.
I hope all of you out there in the Northern Hemisphere are still hanging in! We’re close now.
What a success! Fabulous Fermentation Week was a total blast and gave me so much insight and inspiration. I couldn’t believe the number of bloggers who participated, and I even met a few new foodie friends a long the way. A big thanks to everyone that got involved, and to all of you that embraced the bacteria! It’s pretty neat stuff, I gotta say.
In case you’re still hungering for more, I thought I would share a couple simple kimchi recipes that I have been enjoying this past week. For the original kimchi post, I made about four liters of the stuff, assuming it was enough to last me the year. Um, no. I have about a quarter of the jar left. With at least one serious mow-down daily, and after doling it out to many kimchi-loving friends, this jar will undoubtedly be empty by the time February rolls around! Good thing it is so darn easy to make.
So, I have recently made an exciting discovery: the enoki mushroom. Why haven’t I tried enokis before? Not sure, really. I can’t recall seeing them at the market ever, or if I have, I’m usually reaching past any fungus that isn’t familiar, and choosing portobellos or shiitakes. But these little guys are amazing. Raw or cooked they have a very delicate flavour and incredibly creamy texture. In fact, when heated ever so slightly enokis take on an almost noodle-like texture, due to their long stems that wilt into ribbons. Happily, kimchi and enoki mushrooms seem to be buddies, so I’ve been eating them all curled up together in one totally spicy, crunchy, tangy tangle of yum.
Enoki mushrooms have many health benefits. Because they are low in calories and fat, they may be the ideal food to help one lose weight and maintain a healthy heart and cardiovascular system. Enokis provide the body with a good dose of fiber, B-vitamins, iron, potassium and phosphorus. The also contain several types of amino acids, one of which, valine, has been shown to inhibit the growth of certain cancers. Like many other mushroom varieties, enokis have been shown to significantly enhance the immune system and fight viruses. Eaten on a regular basis they may help to prevent and / or heal gastroenteric ulcers and liver disease.
There are two types of enoki mushrooms; the wild variety that are brown, and the white ones, which are cultivated. It is probably easier to find the latter, especially this time of year. When purchasing enokis, make sure to inspect them for slimy spots, discolouration, and mold. Keep enoki mushrooms loosely wrapped in a paper bag in the fridge and use within two or three days.
Enoki, Broccoli & Kimchi, Two Ways Serves 2
Ingredients: ½ head broccoli 3-4 large handfuls enoki mushrooms knob of ghee or coconut oil 1 clove garlic 2 tsp. each tamari, maple syrup and brown rice vinegar (or lime juice) kimchi, as much as desired
Directions: 1. Combine tamari, maple syrup and vinegar and set aside. 2. Wash and slice broccoli into florets. Brush mushrooms of any dirt or debris, but do not wash them. 3. In a frying pan heat a knob of ghee or coconut oil and add minced garlic. Let sizzle for one minute, then add the broccoli and toss to coat. Cook for 4-5 minutes just until softened and pour in the sauce you made in step 1. Toss well, and let cook for 2 more minutes. Turn off the heat. Add mushrooms and toss until wilted. Add kimchi at this stage to temper the flavour, or keep it raw and add it later…
For Stir-fry with rice: broccoli + enoki mix, from above recipe 1 cup cooked black or brown rice ¼ cup lightly toasted whole sesame seeds, brown or black
To serve, place a serving of rice in each bowl with the broccoli-enoki mix on top. Sprinkle generously with sesame seeds and serve with kimchi on the side. Enjoy.
For Spring Rolls: Ingredients: broccoli + enoki mix, from above recipe kimchi rice paper rolls (about 3 per person) fresh herb of choice (I used cilantro) lightly toasted sesame seeds limes, for garnish
Other add-ins: cucumber bell pepper carrot spring onion avocado sprouts
Directions: 1. After cooking the broccoli and enoki mushrooms let them cool before proceeding… 2. Prepare all the fillings you want. I like to slice the veggies into long strips for ease of rolling. Set aside. 3. Fill a bowl with water (one large enough to lay rice paper flat). One at a time, slip rice paper in water and let soak for about 20 seconds. Remove from water and place on a clean work surface. Fold rice paper in half on itself (this will give you an open-ended roll as pictured) or leave it a full circle for a closed roll – you can see instructions here. Sprinkle rice paper with sesame seeds. Place your desired fillings in a line down the center, making sure to leave a few inches at the bottom (the curved end), and a couple fillings peeking just out over the top edge. Fold the bottom of the rice paper up, turn the right side of the rice paper over towards the left and then roll the rest of the way to the left, pulling slightly to ensure tightness. 4. Serve rolls within a few hours of preparing them. Enjoy.
I hope that Fabulous Fermentation Week got you all revved up for all things fermented too. I am totally excited to try out all the recipes that were submitted and I hope you do too!